by Mark Nemtsas | Dec 23, 2012 | Tips and Tricks, Using the Software
Time Clock MTS includes two distinct methods for employees to clock in and clock out. The first uses the Employee List Interface and the second uses the Keypad Interface. Let’s have a closer look at each method of clocking in and clocking out using Time Clock MTS or you could watch the clock in video tutorial.
Clocking In and Clocking Out with the Employee List Interface
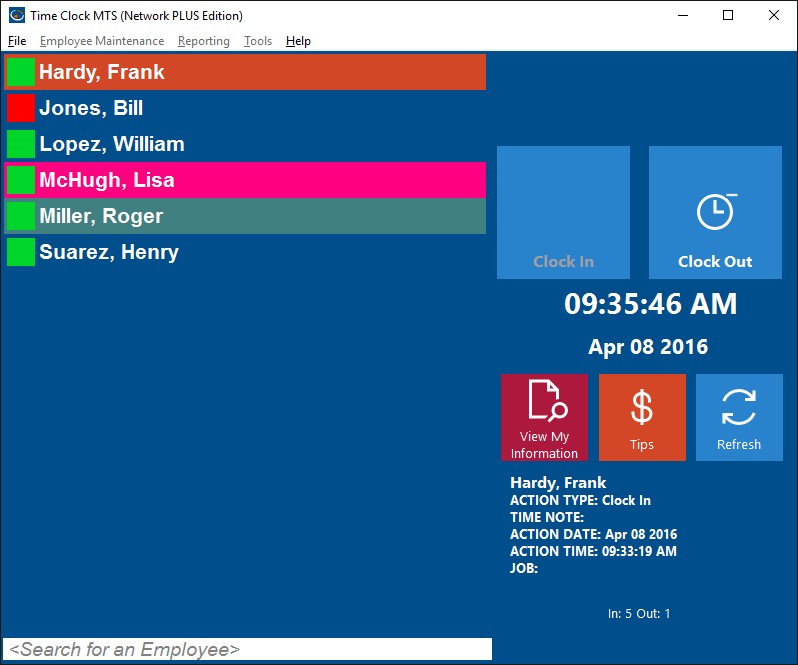
The Employee List Interface
Above you can see the employee list interface of Time Clock MTS. On the left is a list of employees. Next to each employee is a status icon showing the current status of that employee. For example, a green icon indicates an employee is clocked in and a red icon indicates they are clocked out. On the right hand side of the screen are the clock in / out buttons, below that the View My Information button and the status information area. You can use a bar code reader, a magnetic card reader, or even RFID reader with this screen to automatically punch employees in or out without the need to touch a mouse or keyboard. Using the employee list interface to clock in and out is very simple. Just follow these steps:
- Click on the employee’s name in the list who needs to clock in or clock out. Alternatively they can use one of the data input devices (like a bar code scanner) to read an appropriately encoded barcode, magnetic card, or RFID badge and the employee will be punched in or out immediately.
- Depending on their current status either the Clock In or Clock Out button will become active.
- Click on the Clock In or Clock Out button to clock the employee in or out. The employee may have to enter their PIN to complete the action.
- If the clock in or clock out action is successful the status icon for that employee will change and the status information area will show the details of the clock in or clock out.

Clocking In and Clocking Out with the Keypad Interface
The Keypad Interface
Above you can see the keypad interface of Time Clock MTS. On the left is a virtual numeric keypad and on the right is the employee badge number field (at top) and below that is the status information area. The keypad interface is designed to be used with a touchscreen. Like the employee list interface it can also be used with a barcode reader, a magnetic swipe card reader, or even a prox card. Using the keypad interface to clock in and out couldn’t be any easier.
- An employee needs to know their Time Clock MTS badge number to be able to use the keypad interface. All they need to do is enter their badge number using the virtual timeclock keypad (or via a regular keyboard or one of the other data devices I described above). Then they need to click the Enter button. The employee may then have to enter their PIN to complete the action.
- Time Clock MTS will then check the status of employee with the entered badge number and clock them in or clock them out as appropriate. The status information area will show the details of the employee clock in or clock out.
So, there you have it. Two different methods for employees to clock in and clock out of Time Clock MTS. Both are simple to do and quick for your employees to learn and one of them will, no doubt, be suitable for your company.
by kathryn@timeclockmts.com | Dec 19, 2012 | News, User Testimonials, Using the Software
A user of our free timeclock software sent through a nice email this morning explaining how she is using our software.
The freeware version of Time Clock MTS really is free if you’re using it on one computer and have less than four employees. Unlike many other “free” programs we don’t want to know your email, we don’t need a credit card number, and you don’t even need to tell us you’re using it. Just download it and install it and start tracking your employee timeclock data. Even better we’ll give you technical support just as if you were a paying customer. What’s not to like about that?!
by kathryn@timeclockmts.com | Dec 14, 2012 | Tips and Tricks, Using the Software
Protect your business against employee fraud by using Time Clock MTS security features you may not have been aware of.
Time clock fraud by employees is a real problem. It might be happening right now within your business and you are yet to find out. Today we received an email from a company who has had to get the police involved because an employee had been systematically defrauding the company through manipulation of their time clock system. Don’t let this happen to you!
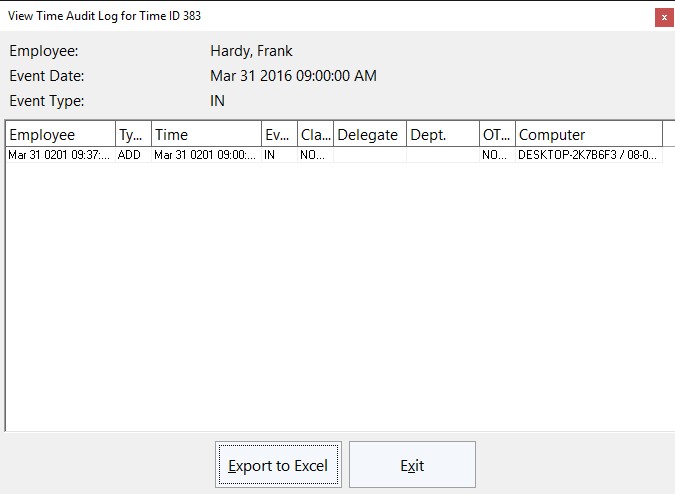
Time Clock MTS has many different security features some of which are turned on by default and some of which need to be turned on by you, the user. An important security feature of Time Clock MTS that you as the administrator can use is audit logging. This feature records the entire editing history of each clock in and clock out event tracking every change and which computer those changes were made from. If the company that has contacted us about their employee time clock fraud had audit logging turned on within their time clock software they could have provided the police with documentation to support any criminal case.
To turn the audit logging system on to monitor your employee activities go to the Tools->Options->Security Options screen and check the box for Enable Audit Logging.
Enable Audit Logging to View the Time Audit Log
Time Clock MTS includes other security features to help you prevent time clock fraud. Some of these include:
by Mark Nemtsas | Dec 8, 2012 | Tips and Tricks, Using the Software
You might think that setting up a barcode time clock is expensive and complicated. If you did think that, you’d be wrong. By my estimation you could setup an old Windows computer with Time Clock MTS, a simple USB barcode scanner, and some “home made” barcode employee badges for under $275. Here’s how I’d do it.
1. Designate a Computer to be your Time Clock Computer
Almost every business has computers these days, and in my experience it’s not unusual for one of these computers to either be highly under-utilized or retired and switched off all of the time. It’s one of these computers that you should use as your time clock station. Cost? In most cases $0.
Total Cost to Date: $0
2. Purchase and Install Time Clock MTS
Time Clock MTS can be purchased for $99 (US). This can track up to 500 employees on a single computer. Once you’ve installed Time Clock MTS, create an employee for each employee you want to track. You could also create many employees at once very easily using the method I describe here. Once you’ve created all of your required employees, print out a Badge Number Report from within Time Clock MTS.
Total Cost to Date: $99 (US)
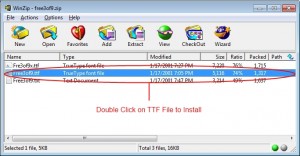
Figure 1 -Installing a Barcode Font
3. Create Your Employee Badges
Creating barcodes is easy. And free. You can do it from within pretty much any word processor or spreadsheet these days. All you need is a barcode font. Yes, a font, just like Arial, or Times New Roman, or Trebuchet. If you do a Google search for “free barcode font” you’ll get a ton of results, and to save you the trouble I did a search and found that this barcode font is free, and works just fine. To install the font just download the ZIP file, unzip it and double click on one of the files with the ttf extension (see the image above). Windows will then auto-magically install the font.
Once the font is installed you can select it from a font selector in your word processor or spreadsheet of choice. You can see below that I created some simple barcodes in Microsoft Word. Note that the barcode font I selected is “Free 3 of 9”. Here’s the tricky bit. You need to decide whether you’re going to use Time Clock MTS in Employee List Mode or Keypad Interface Mode. The barcodes required for each mode are slightly different. If, for example you have an employee with the ID 1000 then the barcodes need to be encoded as follows:
Employee Interface Mode: +1000=
Keypad Interface Mode: 1000
As you can see the only difference is + and = characters around the employee ID on the Employee Interface barcodes. As a further example, if we have an employee with the ID 9999 then the two different barcode formats would be:
Employee Interface Mode: +9999=
Keypad Interface Mode: 9999
When you know the format you need as you create your bar codes you’ll want each barcode to correspond to a Time Clock MTS badge number, the same badge numbers we got from the Badge Number Report we printed out in Step 2 above. In the image below I’ve created badges for the numbers 1010 and 1020 (these badges are for the keypad interface because there’s no + or = characters in them).
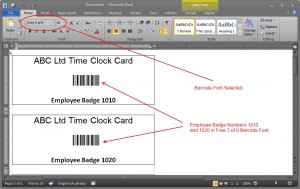
Figure 2 -Simple Employee Badge Design
Now the design of the badge is entirely up to you, in the image above I’ve done a very simple design in Microsoft Word. Given that you’re doing this in a word processor or spreadsheet the sky is the limit really. Once the design is complete print out the cards. I’d suggest a heavy card stock of some type and using a laser printer. I’d also suggest laminating the cards if possible. In any event the cost of the cards is going to be minimal. Less that $0.50 each. For arguments sake let’s say we’re creating 75 badges for 75 employees, giving a cost of $37.50 for the badges.
Total Cost to Date: $136.50
4. Buy a USB Barcode Scanner
Barcode scanners are not expensive items these days. It’s a well known and mature technology and the bugs have well and truly been ironed out. All you need to do is ensure that the scanner comes with the right sort of interface (most likely USB) to plug into your PC and that it can read the barcode that you’re using. Barcodes come in many different types, with names like Code 39 (or type 3 of 9), Code 128, and EAN 2. The free barcode font we downloaded in step 3 is Code 39. While I do need to warn you to check that the reader will be able to understand your barcode type, in the VAST majority of cases readers support pretty much every type of barcode these days.
The actual type of scanner you buy is entirely up to you but I’d stick with better known brands simply for reasons of after sales support and reliability. I’ve used Symbol (made by Motorola) and Gryphon (made by Datalogic) USB Barcode scanners many times in the past and never, ever, had a problem with them. When I wrote this article these could be purchased from Amazon for $120 per unit with $10 shipping.
Total Cost to Date: $266.50
5. Install the Barcode Scanner and Configure Time Clock MTS
When your barcode scanner arrives all you should need to do is plug it into a USB port on your computer. Windows will most likely take care of the rest. You may need to install some drivers though, consult the documentation that ships with your scanner. Once installed the computer should view any data read by your barcode scanner as exactly the same as that entered by a keyboard. Don’t believe me? Try opening up a word processor or Windows Notepad on the computer and scan a barcode, you should see the characters the barcode represents appear in the word processor.
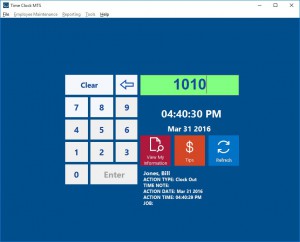
Figure 3 -The Time Clock MTS Keypad Interface
The final step in the process is to configure Time Clock MTS to work with the scanner. If you’ve decided to use the default Employee List mode of Time Clock MTS then you won’t need to configure the software at all. However, if you’ve decided to use the Keypad Interface then I’ve described in some detail how to set that up in the setting up the keypad interface mode article. This shouldn’t take you more than a few minutes.
Total Cost to Date: $266.50
6. Start Employees Clocking in and Out
Once Time Clock is working in your chose mode and you’ve printed out your barcode badges in the correct format then clocking an employee in or out is as easy as scanning one of the badges you made in step 3 above. When you scan the badge Time Clock MTS will read the badge number and then clock the employee with the corresponding badge number in or out as appropriate. Is really couldn’t be any simpler.
Grand Total: $266.50
There you have it, a barcode time clock system for under $275. In my experience a company will likely recoup up to $5 per employee per week when they start using a system like this. This recovery includes indirect costs such as no longer having to waste time using inefficient paper based systems and the associated time spent processing the data created by those systems. The recovery also includes direct costs by largely eliminating employee time clock fraud. $5 per employee per week? If you’ve got 10 employee’s you’ll get your $275 back in just over a month. 20 employees and you’ll get it back in a fortnight. Any more than 20 employees and you should be asking yourself why you’re still reading this and you haven’t started setting up such a system already.
by Mark Nemtsas | Dec 1, 2012 | Tips and Tricks, Using the Software
I had a good question from a user of our employee timeclock software about wanting to track the hours employees spend at lunch but still pay the employees for those hours. The solution is to make use of the job tracking features of Time Clock MTS. I thought it would be worthwhile giving a step-by-step example of how you might set this up and how employees would track their lunch hours.
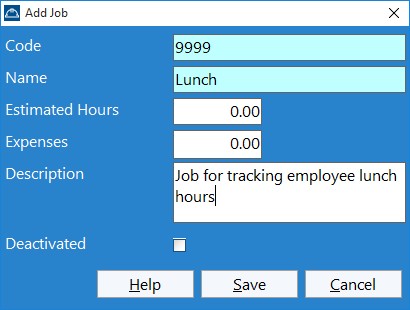
Figure 1 – Adding a Lunch Job
1. Create a Lunch Job
Log into the Time Clock MTS Administrator program and go to the Tools->Options->Job Tracking screen. On the Job Tracking screen click the  button to create a new job. You’ll then be shown the Add/Edit Job screen (see Figure 1). Enter some details for the Lunch Job and give it a job code that can be easily remembered. In this case I gave it the code 9999. Click the Save Job to add the job. You’ll be taken back to the Job Tracking screen where you’ll see the new Lunch Job in the job list. See Figure 2.
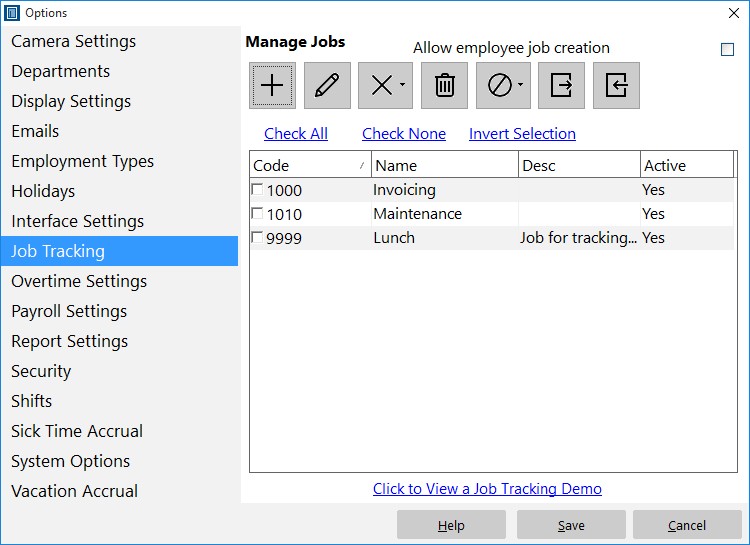
Figure 2 – The Job is Created
2. Turn on Job Tracking
The next step is to turn on job tracking for each employee that you want to track lunch hours for. This is done via the Employee Maintenance->Edit Employee->Employee Information screen (see figure 3). When on this screen make a selection from the Job Tracking dropdown. If you’re not going to be tracking other jobs then you should probably set this to Optional. Don’t forget to press the Save Employee button to save the changes.
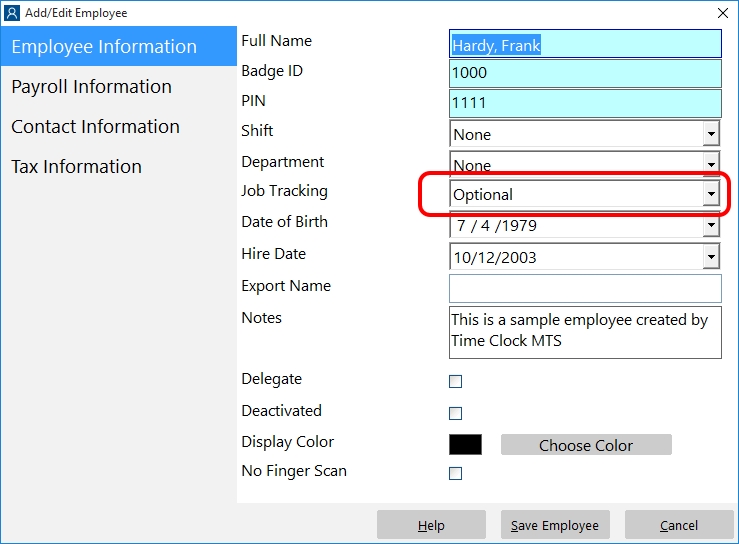
Figure 3 – Turn on Job Tracking
3. Clock Onto the Lunch Job
Clocking onto the Lunch Job is simple. When the employee is ready to take their lunch break, they need to clock out of Time Clock MTS. When they do they’ll be shown the Switch Jobs screen (see Figure 4). Have them click the Switch Jobs button. The Enter Job Code screen (See Figure 5) will then be displayed where the employee can enter the Lunch Job code (in this case 9999). When the code is entered correctly click the Enter button to clock onto the Lunch Job.
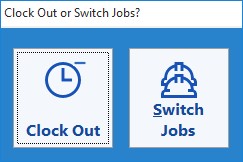
Figure 4 – Switching Jobs
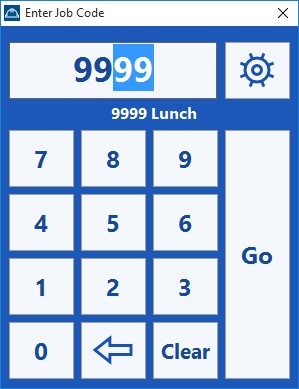
Figure 5 – Choosing the Lunch Job
4. Clock Off of the Lunch Job
When the employee is finished lunch and they need to clock out of the Lunch Job have them clock out as normal. Again they’ll be shown the Switch Jobs screen (Figure 4). Click the Switch Jobs button again and then when the Enter Job Code screen is displayed the employee just needs to click the Enter button WITHOUT entering a job code. This will put them back on normal Time Clock MTS time.
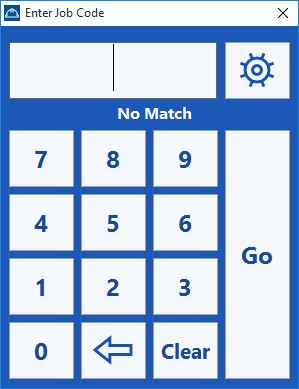
Figure 6 – Clocking Out of Lunch Job
5. Run Reports
Once your employees are tracking their lunch hours you can use one of the job-based Time Clock MTS reports such as the Job Time Report or the Job Punchcard Report. In this example I decided to run the Job Punchcard report which you can see in Figure 7. Towards the bottom of the report you can see that this employee booked 0.95 hours (or 57 minutes) to lunch on November 30.
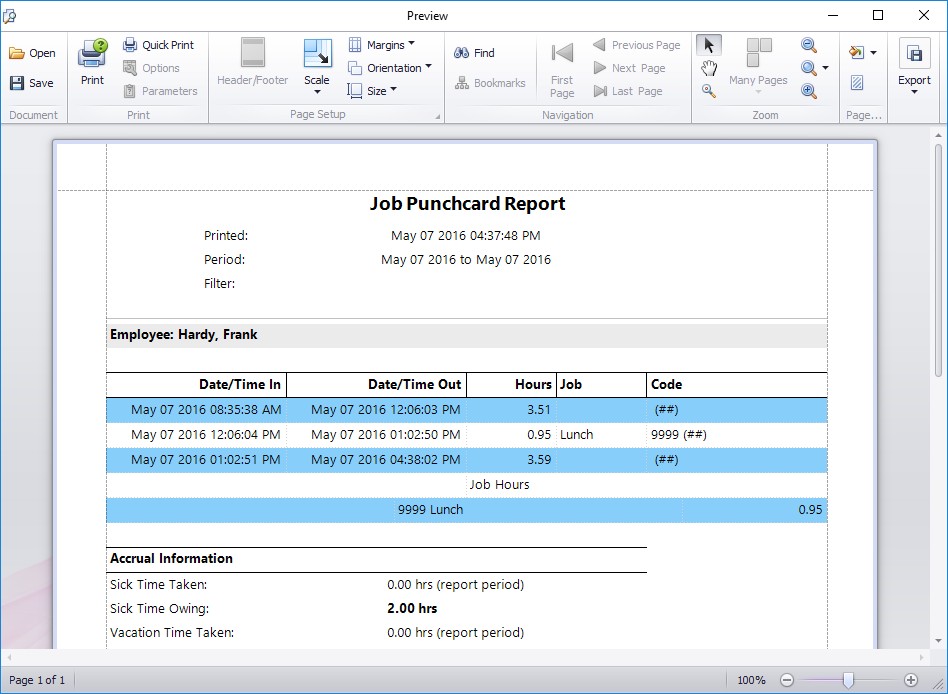
Figure 7 – The Job Punchcard Report
6. Conclusions
I hope that you’ll find that process useful. It can be setup in just a few minutes and allows you to break down the time spend fairly easily. It doesn’t have to be restricted to tracking lunch hours though, you could track other break times, or even track the time that employees spend working in different roles inside your company.
by Mark Nemtsas | Nov 28, 2012 | How To, Using the Software
Employee time off requests in Time Clock MTS are a convenient and easy way for employees to request time off. The time clock administrator can then approve or deny these requests and automatically create time punches for the requested time off period. In previous Time Clock MTS How-To Articles I talked about setting up Time Clock MTS to allow employees to request time off, how employees place time off requests, and how the time clock administrator uses the time off request management screen. This article covers how an administrator approves a time off request.
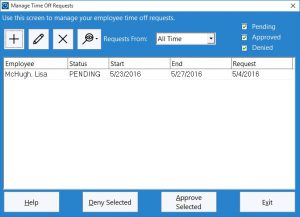
Figure 1 – The Administrator Time Off Requests Screen
1. The Administrator Time Off Requests Screen
To approve a time off request the time clock administrator must use the Administrator Time Off Requests screen. This is accessible from within the Time Clock MTS Administrator program via the Tools->Time Off Requests menu. You can see this screen above. To approve a request click on it in the list (it must have the PENDING status) and click on the Approve Selected button.
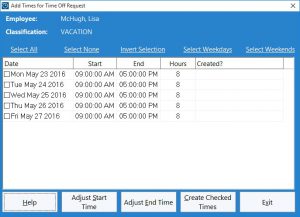
Figure 2 – The Add Times for Time Off Request Screen
2. The Add Times for Time Off Request Screen
The Add Times for Time of Request screen (see above) is then displayed. This screen is used to create time punches for each of the days the employee has requested off. The screen allows users to select what days in the period to create punches for, and allows adjustment of the start and end time of each day in the time off period. Links are provided above the list to allow users to select different days during the period, for example, all the days, the weekdays, or the weekends.
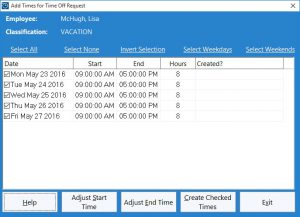
Figure 3 – All Times Selected
3. Select the Times to Create
The first step is to select the days to create punches for. In this example we shall create a clock in and out for each day. To do this we can either check the boxes next to each day in the list or click on the Select All link. Note in the image above that all days have the checkbox next to them ticked. Note also that we’ve selected the last day in the period because we want to change the end time for this day (perhaps employees work a shorter day on Friday).
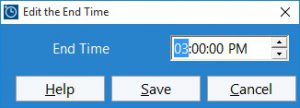
Figure 4 – Changing End Time to 3:00PM
4. Adjust the Start / End Times
Once the day you want to adjust the time for is selected click the Adjust Start Time or Adjust End Time buttons as required. In this case we’re going to adjust the end time to 3:00PM. This is done using the screen shown above. Click the Save Time button to save the change.
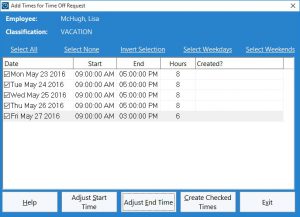
Figure 5 – Ready to Go!
5. Create the Time Punches
In the screenshot above you can see that we’re ready to go. All of the days we want to create punches for are checked and the end time for Friday has been changed to 3:00PM. We can now go ahead and create the time punches by clicking the Create Checked Times button. Time Clock MTS will now attempt to create punches for each of the selected days.
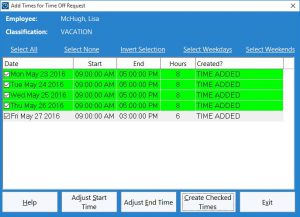
Figure 6 – Times Added
6. Check the Times
As Time Clock MTS creates (or cannot create) a clock in and out for each day the color of each day in the list will change and a message will be displayed alongside of each . Days that successfully have a clock in and out created will be green while those that do not will be red. Above you can see that we’ve created all of the time punches successfully for this time off request. We can now click the Exit button and we’ll be shown the Approval Notes screen.
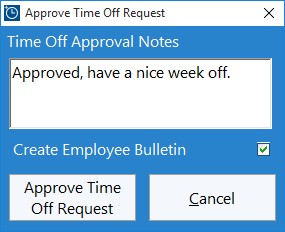
Figure 7 – Entering Approval Notes
7. Enter Approval Notes
On this small screen (see above) we can add some notes to go along with the approval for the time off request. If the Create Employee Bulletin checkbox is ticked then the employee will be shown the approval notes via a popup bulletin the next time they clock into Time Clock MTS. Click the Approve Time Off Request button to proceed back the Administrator Time Off Requests screen. Note that at this stage you can still click the Cancel button to stop the approval process but any time punches created in the previous steps will not be deleted.
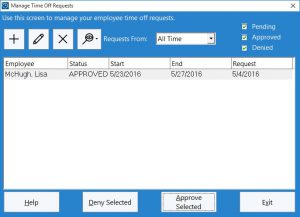
Figure 8 – Request Approved!
8. You’re Done!
In the screenshot above we can see that the time off request now has a status of APPROVED. The time off request approval process is now complete.


 button to create a new job. You’ll then be shown the Add/Edit Job screen (see Figure 1). Enter some details for the Lunch Job and give it a job code that can be easily remembered. In this case I gave it the code 9999. Click the Save Job to add the job. You’ll be taken back to the Job Tracking screen where you’ll see the new Lunch Job in the job list. See Figure 2.


