by Mark Nemtsas | Jul 25, 2011 | How To, Tips and Tricks, Using the Software
The recent release of Version 3.2.1 of Time Clock MTS saw the addition of a new feature to the Edit Times Screen that allows the insertion of a missing punch into the middle of an existing clock in/out pair. The typical situation where this might be useful is if an employee forgets to clock out for a break. This blog entry takes you through the process of inserting a missing punch using the Edit Times screen.
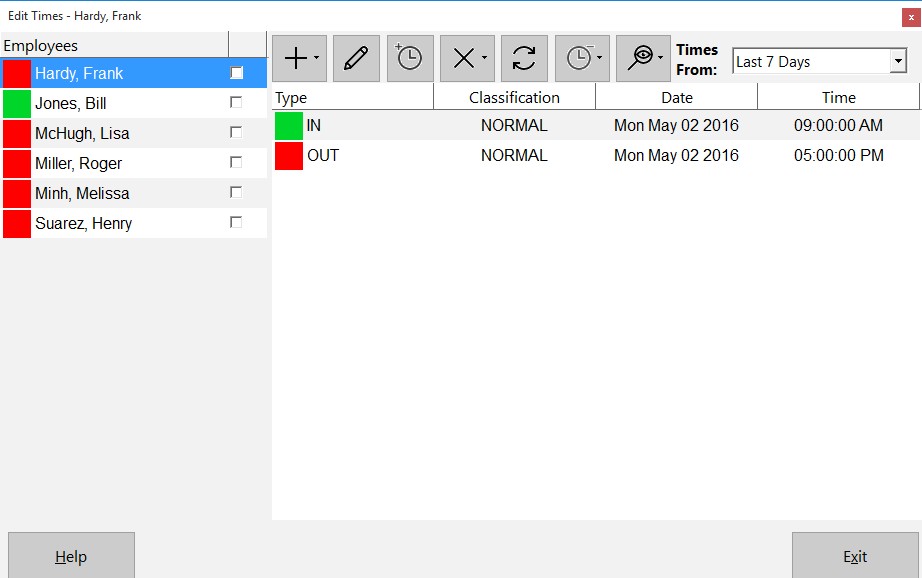
Figure 1 – Missing Punch on Edit Times Screen
Above you can see the Edit Times screen for an employee who has clocked in just before 9:00AM and clocked out just after 5:00PM. The employee has forgotten to clock out for lunch so the administrator must insert punch to represent the break. To do this you must click on either the clock in or out where you want to insert the missing punch and then click the Insert Missing Punch  button.

Figure 2 – The Insert Missing Punch Screen
Above you can see the Insert Missing Punch screen. Note that the Clock Out time is first and the Clock In comes next. This is because when you insert a missing punch you are representing a missed clock out and back in, which in our example is a missed 30 minute lunch break. It’s worth noting that you can also add a time note, assign a job to the missing punch, and change the overtime calculation method. It is important to realize that these settings only affect the newly created Clock In.
Let’s go ahead and adjust the Clock Out and Clock In times to the lunch break times of 12:00:00PM and 12:30:00PM.
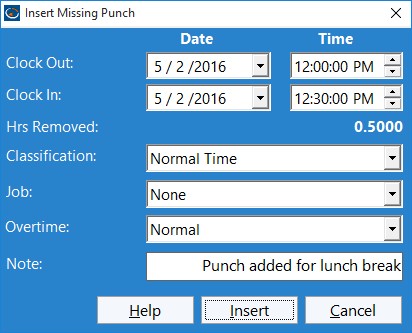
Figure 3 – The Insert Missing Punch Screen
Above you can see we’ve edited the screen to give the times wanted and have also added a note to record why this punch was inserted. We’ll go ahead now and click the Insert Punch button to add the clock out and in. This will take us back to the Edit Times screen.
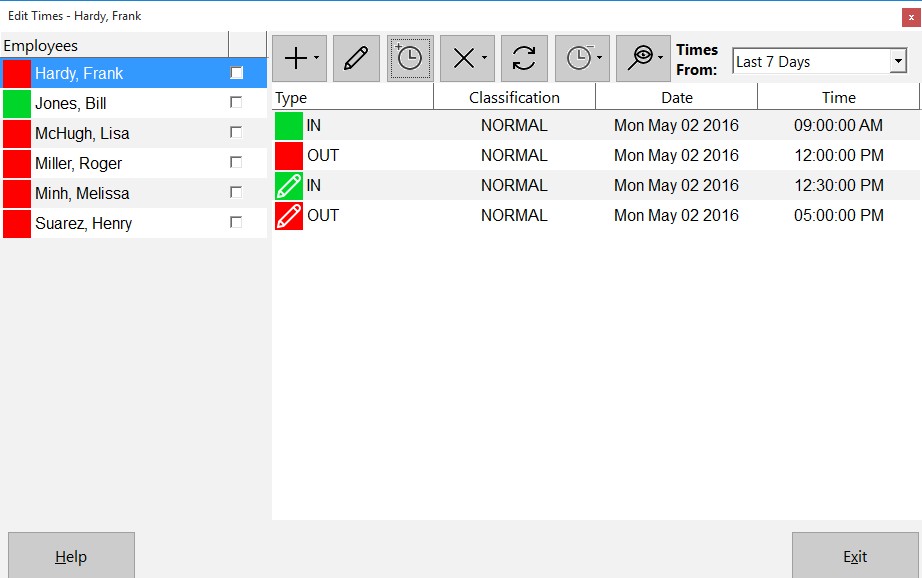
Figure 4 – The Edit Times Screen with Missing Punch Inserted
You can see in the image above that the missing punch has been added to represent the lunch break that the employee forgot to clock out and in for. Previously you could insert a missing punch into Time Clock MTS by using the Edit Time screen and by adding a new time but this new button greatly streamlines the process and helps to eliminate any potential for error.
As always if you have any questions please feel free to ask me!
by Mark Nemtsas | Apr 30, 2011 | How To, Tips and Tricks, Using the Software
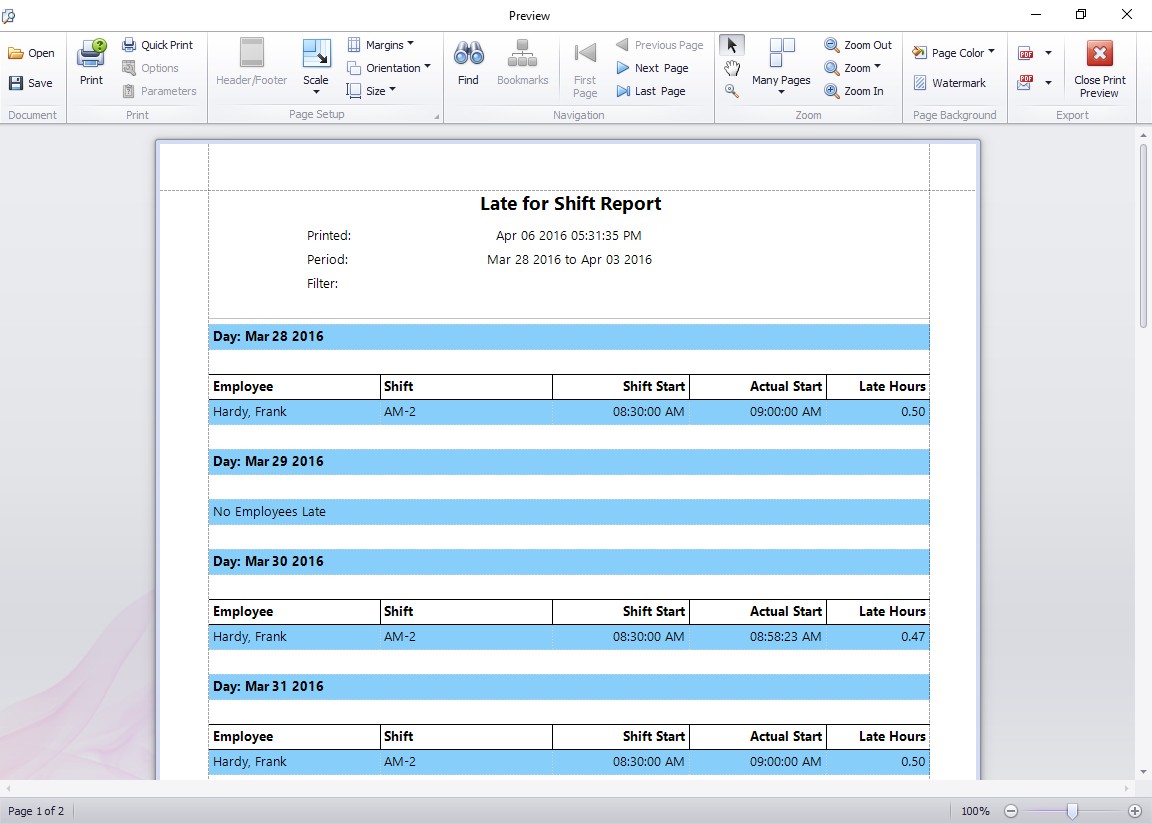
The late for shift report displays all employees that have arrived for work after their designated shift start times.
The recent release of Version 3.1.5 of Time Clock MTS included a new report that allows users to easily run a report displaying employees that have clocked in late for their shift. The output of this report can be seen above. Here’s how to setup Time Clock MTS to allow you to use this report to track when your employees are clocking in late for their shifts.
- For each different shift start time you need to track you’ll need to create a shift on the manage shifts screen in Time Clock MTS. You can do this in Tools -> Options -> Shifts. Read more about Shifts in the online help files. Made sure to set the shift start time to the time that you want to track.
- Assign each employee to the shift that they work. You can do this on the Employee Maintenance -> Edit Employee screen. See Employee Information in the Online Help File.
- Have your employees clock in and out using Time Clock MTS as normal.
- Run the Late for Shift report on the Report Configuration Screen. The report can be run over one or many days, and run for one or many employees.
- You can now interpret the report. It will give you a day by day list of the employees that have clocked in late for their shift. Each employee late arrival will be displayed along with the employee name, their shift name, the scheduled shift start, their actual arrival time, and the amount of time that they were late.
by Mark Nemtsas | Apr 28, 2011 | Tips and Tricks, Using the Software
Before I started work on Time Clock MTS I’d worked at many different companies who thought that building a simple employee attendance database in preference to using paper time cards would save them a lot of time and money. Of course, when comparing the on-going costs of using a well-executed employee attendance database to those of using paper time cards these companies were exactly correct. They could justifiably expect to save time in the area of employee attendance data collection, save significant time in the processing of this data, and ideally good improvements in the reporting of employee attendance. Not only would improvements be seen in the actual labor expended but also, in the timeliness of data collection and reporting. This is because there’d be no more chasing up late timesheets from uncooperative employees by a harried payroll staff member.
These same companies also believed that they had unique requirements which meant that an off the shelf employee attendance software solution wouldn’t work for them. So in several cases I was engaged to develop a custom software solution knowing that in many cases their ‘unique’ requirements were no different to what many other companies required. The end result was that the on-going cost savings that an employee attendance database delivered were offset against high initial development costs. Thus a much longer time was required before a company saw a positive return on their software investment. In most cases they “unique” requirements of each company turned out to be just naming conventions, or reporting formats or report cycles, or the requirement to track (what turned out to be) fairly minor additional data or information along with normal employee attendance data.
After having been through this development process several times I resolved to build Time Clock MTS, a program that would deliver a simple feature set to allow for tracking of employee time and attendance data. The features would be broad enough to make the software suitable to a wide range of businesses of varying size. There would also be a degree of customization available within the software in targeted areas to allow companies to change it to suit what they believed were largely unique requirements. This has proven to be successful, with more than 10,000 companies currently using Time Clock MTS. These companies have from 1 to 1,000 employees and come from many different (and seemingly un-related) industry segments. As I expected, the time and attendance tracking requirements of most businesses are are similar enough that Time Clock MTS can be used to track their employee attendance without the need for a custom software solution for each company.
If it turns out that your company is considering developing a custom employee attendance database to suit what you believe are you own set of unique requirements then you’ll probably want to think long and hard before doing so. You might find yourself wasting hundreds of hours and months of elapsed time on a task that amounts to little more than re-inventing the employee attendance database wheel. Instead of doing this consider that a time clock system like Time Clock MTS can deliver on all or almost all of your requirements in one easy to use package for just $99 (US). Why not download free 30 day trial of Time Clock MTS and you will find that it can meet your employee attendance tracking needs.
by Mark Nemtsas | Apr 22, 2011 | Tips and Tricks, Using the Software
If you make use of the security feature in Time Clock MTS that allows you to use an internet time server to set the time that Time Clock MTS uses then very occasionally you might get this error message:
You cannot currently clock in as synchronization with the Internet Time Server has failed at startup or for at least 1 hour after startup. Re-start the software to try to synchronize again or talk to your Time Clock MTS administrator.
In simple terms this message means that Time Clock MTS has been unable to connect to your selected time server for a period of time and for security reasons has prevented employees from clocking in or out. The cause of this error is usually one of two things. The first is that you’ve just got a temporary network problem and given a bit of time the issue will resolve itself. The second reason is that the time server you’ve chosen for Time Clock MTS to synchronize itself to is either experiencing extreme load or has been disabled completely. Here’s a couple of things to try if you believe your message is due to the second reason:
1. Try connecting to our own dedicated internet time server instead of a third party server. We’re committed to maintaining this time server so you’re assured it will always be available.
2. Rather than using Time Clock MTS to get a time from an internet time server use Windows itself to do this and then lock down the Windows permissions to prevent users from just manually changing the system time. To learn how to do this take a look at our blog entry covering what to do when the internet time server doesn’t work.
by Mark Nemtsas | Apr 16, 2011 | Tips and Tricks, Using the Software
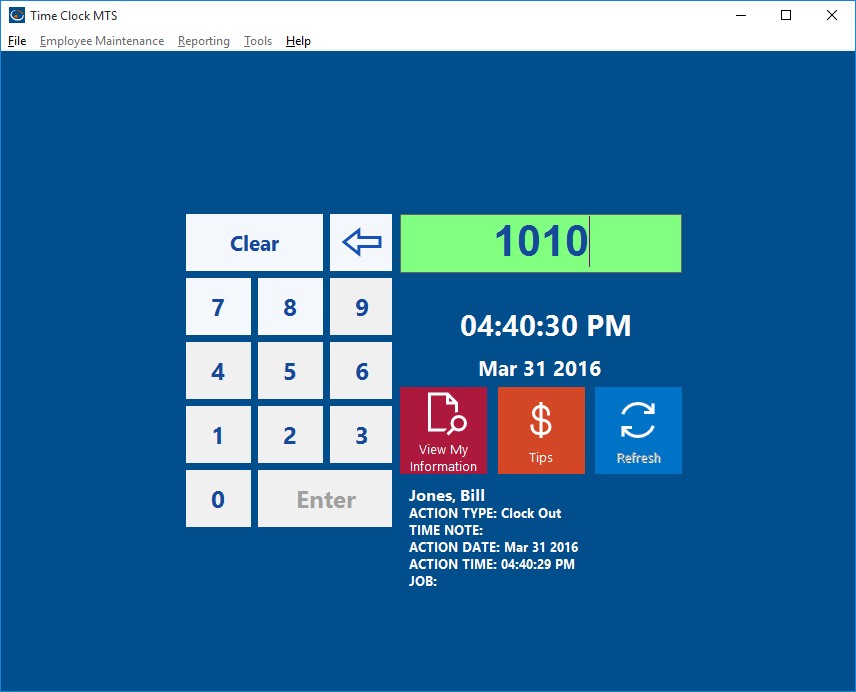
The Time Clock MTS Keypad Interface
Time Clock MTS was designed to be a flexible barcode attendance system for small and medium sized businesses. Here’s what you need to do so that you can use Time Clock MTS as your Barcode Attendance System.
- Decide if you’re going to use Time Clock MTS in Employee List mode or Keypad Mode If you’re going to use Employee List mode then you’ll need to read the instructions on this page. If you’re going to use the Keypad Mode then keep reading the page you’re on now.
- Install and run Time Clock MTS. Log into Time Clock MTS as the administrator and go to the Tools->Options->Interface Settings Screen.
- Change the Data Entry Mode setting to “Keypad”.
- Save the changes.
- Log out of the administrator mode of Time Clock MTS and you should see the Keypad interface of the software (see the screenshot above).
- Get a suitable barcode reader. Time Clock MTS requires a barcode reader that has a ‘keyboard wedge’ or a ‘software wedge’. This means that it can be plugged into either the USB port or old style PS2 keyboard port of your computer and output characters to your computer exactly the same as a computer keyboard. Sometimes the reader will come with some software that needs to be installed to allow this to happen.
- Configure the barcode reader to put a return character at the end of each scanned barcode. Most readers do this by default but you might need to change the settings of the reader via the configuration software that comes with it.
- Log back into Time Clock MTS as the administrator and create your employee records in Time Clock MTS using the Employee Maintenance->Add New Employee screen. Take note of each employee’s Badge ID
- Get your employee barcode attendance badges printed. The data encoded should be each employee’s badge ID and no other data. Make sure that the barcode encoding you use is supported by your barcode reader.
Now that you’ve configured the software, setup your bar code reader, and printed your employee bar code badges you’re ready to start using Time Clock MTS as a bar code attendance system. All you need to do is run Time Clock MTS in keypad interface mode and have it as the active Windows application. As employees scan their bar code attendance badges the employee badge id will appear in the badge number field on the screen and the clock in or out action will be triggered automatically. Note that if you’ve got employee PINs or employee notes activated then your employees will still need to enter this information via keyboard or touchscreen.
If you require more detailed instructions on setting up Time Clock MTS as a barcode attendance system then please take a look at this article, Time Clock MTS and Bar Code Readers.
by Mark Nemtsas | Apr 15, 2011 | How To, Tips and Tricks
At last count nearly 50 churches were registered users of Time Clock MTS and we know that many of these use Time Clock MTS to track student attendance at Sunday school. The tracking requirements for a Sunday school are not too dissimilar to that needed for regular school attendance software but it’s worth some effort looking at how to use Time Clock MTS as Sunday school attendance software effectively.
Customize the User Interface
Using the Interface Settings Screen customize the main user interface to suit the Sunday school environment. Your students will likely be offended to be called employees, so change those labels to ‘students’, you might like to change the ‘clock in’ and ‘clock out’ to less work oriented terms too. I’d suggest ‘Arrive’ and ‘Depart’.
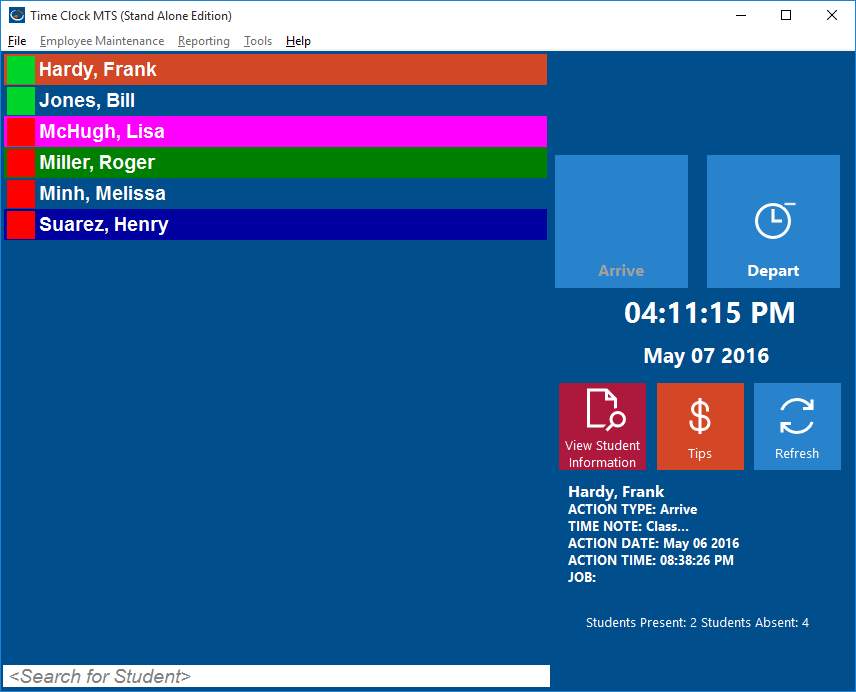
Customization for Sunday School Attendance
Create Jobs to Track Lessons or Classes
If you want to track your student attendance to various lessons then I’d suggest making use of the job tracking features of Time Clock MTS. So, if for example, you had a series of lessons on the various books of the New Testament you could assign each a code and have your students clock in and out with this code as they attend each different lesson. At the end of the series of lessons you could offer those students who missed out catch up sessions. Determining who missed out is very simple, just run the Job Time Report.
Create Departments for Each Teacher
If you run a larger Sunday school you might find it useful to track student attendance by teacher. To do this create a department representing each teacher and assign students to each department using the Manage Employees screens. You could then easily see a class list for each teacher and report on attendance to each teachers class by simply running Time Clock MTS attendance reports on a department by department basis.
Record Sunday School Attendance
Using Time Clock MTS to record Sunday school attendance is quite simple. You could do it in two ways. The first is to provide a central computer (or computers) and to have your students check in when they arrive for a class and then check out when they depart. Alternatively if your classes are smaller you might have the teachers take attendance on a laptop or similar and check each student in when roll is called at the beginning of class.
Report on Sunday School Attendance
If you make use of the Employee Status Report you’ll find that it’s a super quick and easy way to check what students are attending your Sunday school classes. If you’re wanting to track lesson attendance and you’ve made use of job tracking then the various job tracking reports will easily give you the information you need.
Conclusions
Time Clock MTS wasn’t really designed to be used as Sunday School Attendance Software, but as features have been added over the years it certainly has become flexible and useful enough to be used as such. With almost 50 churches currently using it in the role it clearly has something to offer with a customizable interface, flexible tracking options, and powerful reporting. All of this at a remarkably inexpensive price.
