by Mark Nemtsas | Apr 16, 2011 | Tips and Tricks, Using the Software

The Time Clock MTS Keypad Interface
Time Clock MTS was designed to be a flexible barcode attendance system for small and medium sized businesses. Here’s what you need to do so that you can use Time Clock MTS as your Barcode Attendance System.
- Decide if you’re going to use Time Clock MTS in Employee List mode or Keypad Mode If you’re going to use Employee List mode then you’ll need to read the instructions on this page. If you’re going to use the Keypad Mode then keep reading the page you’re on now.
- Install and run Time Clock MTS. Log into Time Clock MTS as the administrator and go to the Tools->Options->Interface Settings Screen.
- Change the Data Entry Mode setting to “Keypad”.
- Save the changes.
- Log out of the administrator mode of Time Clock MTS and you should see the Keypad interface of the software (see the screenshot above).
- Get a suitable barcode reader. Time Clock MTS requires a barcode reader that has a ‘keyboard wedge’ or a ‘software wedge’. This means that it can be plugged into either the USB port or old style PS2 keyboard port of your computer and output characters to your computer exactly the same as a computer keyboard. Sometimes the reader will come with some software that needs to be installed to allow this to happen.
- Configure the barcode reader to put a return character at the end of each scanned barcode. Most readers do this by default but you might need to change the settings of the reader via the configuration software that comes with it.
- Log back into Time Clock MTS as the administrator and create your employee records in Time Clock MTS using the Employee Maintenance->Add New Employee screen. Take note of each employee’s Badge ID
- Get your employee barcode attendance badges printed. The data encoded should be each employee’s badge ID and no other data. Make sure that the barcode encoding you use is supported by your barcode reader.
Now that you’ve configured the software, setup your bar code reader, and printed your employee bar code badges you’re ready to start using Time Clock MTS as a bar code attendance system. All you need to do is run Time Clock MTS in keypad interface mode and have it as the active Windows application. As employees scan their bar code attendance badges the employee badge id will appear in the badge number field on the screen and the clock in or out action will be triggered automatically. Note that if you’ve got employee PINs or employee notes activated then your employees will still need to enter this information via keyboard or touchscreen.
If you require more detailed instructions on setting up Time Clock MTS as a barcode attendance system then please take a look at this article, Time Clock MTS and Bar Code Readers.
by Mark Nemtsas | Apr 15, 2011 | How To, Tips and Tricks
At last count nearly 50 churches were registered users of Time Clock MTS and we know that many of these use Time Clock MTS to track student attendance at Sunday school. The tracking requirements for a Sunday school are not too dissimilar to that needed for regular school attendance software but it’s worth some effort looking at how to use Time Clock MTS as Sunday school attendance software effectively.
Customize the User Interface
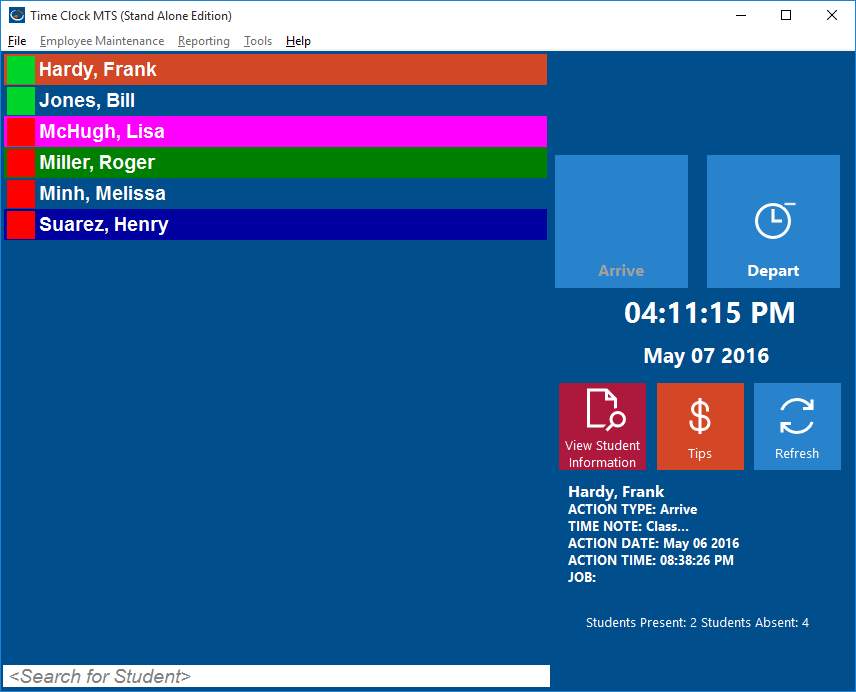
Using the Interface Settings Screen customize the main user interface to suit the Sunday school environment. Your students will likely be offended to be called employees, so change those labels to ‘students’, you might like to change the ‘clock in’ and ‘clock out’ to less work oriented terms too. I’d suggest ‘Arrive’ and ‘Depart’.

Customization for Sunday School Attendance
Create Jobs to Track Lessons or Classes
If you want to track your student attendance to various lessons then I’d suggest making use of the job tracking features of Time Clock MTS. So, if for example, you had a series of lessons on the various books of the New Testament you could assign each a code and have your students clock in and out with this code as they attend each different lesson. At the end of the series of lessons you could offer those students who missed out catch up sessions. Determining who missed out is very simple, just run the Job Time Report.
Create Departments for Each Teacher
If you run a larger Sunday school you might find it useful to track student attendance by teacher. To do this create a department representing each teacher and assign students to each department using the Manage Employees screens. You could then easily see a class list for each teacher and report on attendance to each teachers class by simply running Time Clock MTS attendance reports on a department by department basis.
Record Sunday School Attendance
Using Time Clock MTS to record Sunday school attendance is quite simple. You could do it in two ways. The first is to provide a central computer (or computers) and to have your students check in when they arrive for a class and then check out when they depart. Alternatively if your classes are smaller you might have the teachers take attendance on a laptop or similar and check each student in when roll is called at the beginning of class.
Report on Sunday School Attendance
If you make use of the Employee Status Report you’ll find that it’s a super quick and easy way to check what students are attending your Sunday school classes. If you’re wanting to track lesson attendance and you’ve made use of job tracking then the various job tracking reports will easily give you the information you need.
Conclusions
Time Clock MTS wasn’t really designed to be used as Sunday School Attendance Software, but as features have been added over the years it certainly has become flexible and useful enough to be used as such. With almost 50 churches currently using it in the role it clearly has something to offer with a customizable interface, flexible tracking options, and powerful reporting. All of this at a remarkably inexpensive price.
by Mark Nemtsas | Apr 15, 2011 | How To, Tips and Tricks
A quick browse through our customer database shows at the time of this post that 68 schools (not including colleges and universities) are using Time Clock MTS. It’s safe to assume that some of these, at least, are using Time Clock MTS as school attendance software. I thought it would be useful to look at how you could configure Time Clock MTS to track and record the attendance of students within schools.
Change the Time Clock MTS Display Labels

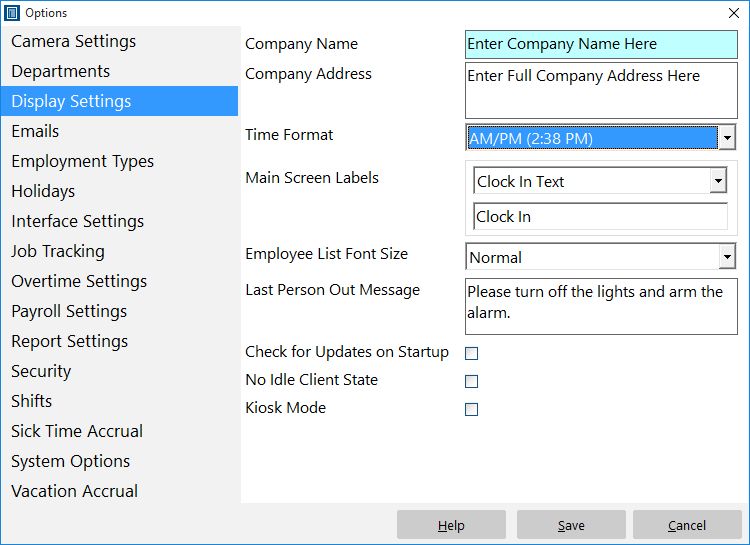
The Display Settings Screen
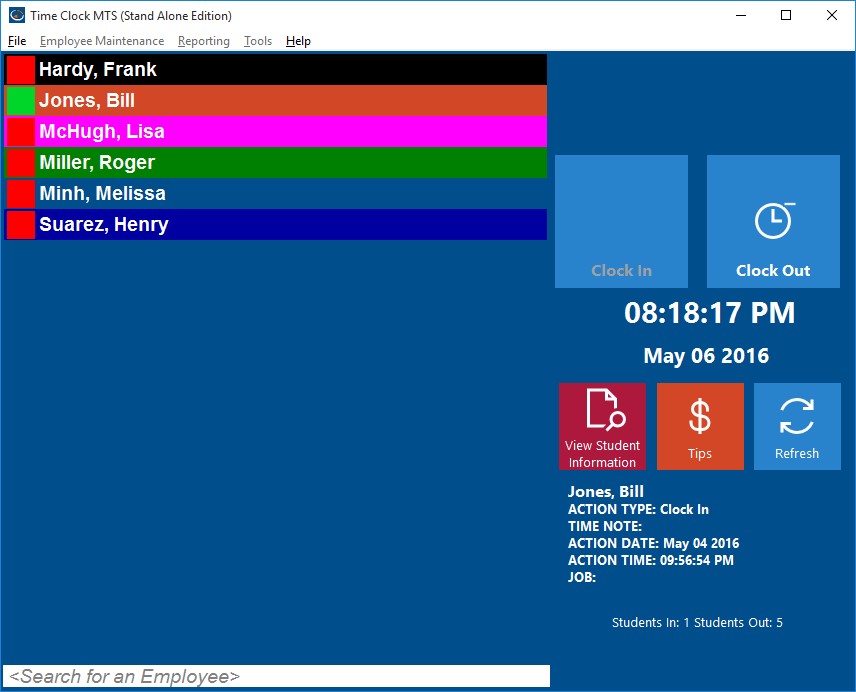
Above you can see the Tools->Options->Display Settings screen. You can use the ‘Main Screen Labels’ options to change the text shown on the main screen of Time Clock MTS. We originally designed this to allow users to translate the main screen into other languages but we are aware that some users are using it to make the software more user friendly to their particular business. If you’re using Time Clock MTS as school attendance software then you can easily make it more student friendly by changing these terms. The image below shows what the result can be when making the software more school friendly.

Time Clock MTS configured as school attendance software
Record Student Contact Information
The Manage Employees screens in Time Clock MTS allow you to record the student name, contact information, and alternate contact information. This is immediately useful if a school needs to contact a student, their parents, or notify someone due to an unexplained school absence.
Track Students by Class
Student attendance by class could be easily tracked using the departmental tracking features with Time Clock MTS. Simply create a department for each student class and then assign each student to the correct class using the Manage Employees screens mentioned above. You could then setup your Time Clock MTS clients (clocking stations) to display only the students from appropriate class. Alternatively you could configure the student list to display in folder view and have an expandable list of classes and students that could be looked through very quickly and easily.
Track Daily Attendance
Time Clock MTS can be easily used to track the daily attendance of a student. Simply have them check in when they arrive for home class, or perhaps when they enter the school building.
Period Attendance
Using the Job Tracking features of Time Clock MTS you could easily configure the software to track student attendance by period. Simply create a job code for each subject and have students clock into each subject’s period using the appropriate job code.
Report on Student Attendance
The Employee Status Report gives you a quick and easy way of reporting on student attendance. It’s a simple matter to run this report and see what students are not at school for the day and then make contact with their parents to notify them of their absence. For more comprehensive reporting the Simple Attendance Report could be used to print off attendances by class or period and then distributed to teachers via noticeboard or email.
Conclusions
While Time Clock MTS wasn’t specifically designed as school attendance software many of the features allow it to be used as such. The customizations available will make it easy to use for your students, while configuration options will easily allow you to track student attendance by class or period as well as allowing to store their contact details. Comprehensive and flexible reporting then allows for simple attendance tracking of your student population.
by Mark Nemtsas | Apr 6, 2011 | Tips and Tricks, Using the Software
Here’s a question we just got from a Time Clock MTS user:
I seem to have another problem that I’m not sure we can solve. The guys that are using the time clock are pretty computer savy. I’m sure one of them changed the date on the computer that they sign in on – the time that is used is off of the that computer not the time on the “client” computerm(or my computer)… I have not “called” them on it yet and won’t unless it happens again, but I went out and it is very easy to change the clock and clock in or out then change the clock back to the regular time. Do you know of any way to LOCK the time on the computer they are signing in on? Or any other way around it?
There’s a few ways to prevent this sort of thing from happening, here’s the solutions I suggest in the order that I consider best to worst.
- Setup your Windows system to get the system time from an Internet Time Server and then put in place a system policy to remove permissions for your Windows users to change the system time.
- Configure Time Clock MTS to get it’s time from an Internet Time Server. We’ve recently setup our own dedicated time server, so we suggest you make use of it for maximum reliability.
- Turn on the “Do Not Allow System Clock Changes” setting and require the administrator password when the software is started. You can change both these settings on the Security Settings Page. This will prevent users from closing Time Clock MTS, changing the system time and then re-starting the software.
- Turn on the “Do Not Allow System Clock Changes” setting on the Security Settings Page. This is fairly insecure because employees can just close the software and change the system time and re-start the software.
by Mark Nemtsas | Mar 25, 2011 | News
It appears that the first three time servers that Time Clock MTS can use to set the system time are no longer functional, this is due to extreme load on those servers. The time servers involved are:
time-a.timefreq.bldrdoc.gov
time-b.timefreq.bldrdoc.gov
time-c.timefreq.bldrdoc.gov
We’ve tested the following servers and they appear to be working just fine:
utcnist2.colorado.edu
nist1-chi.ustiming.org
nist1-lv.ustiming.org
nist1-ny.ustiming.org
nisttime.carsoncity.k12.mi.us
So for the time being we’d suggest you switch to one of these or enter the details into the custom time server field on the Security Settings Screen. We’re investigating the possibility of setting up our own time server to ensure a more reliable system. Stay tuned for more information.


