If you’ve got several employees in your business who are receiving different amounts of hourly pay, it can be difficult to keep track of it all manually. Time Clock MTS is a simple and easy time clock system that helps you manage the information of all your individual employees.
Overtime is one of those things that’s well-known for getting slightly confusing. However, with a effective and easy-to-use time and attendance tool, you can set the hourly overtime rate for each employee (even if it varies from one employee to another) and let the computer work out the rest!
This Time Clock MTS How To Article is a step-by-step guide for setting up daily overtime for your employees using Time Clock MTS.
- Log in as the Administrator. You can do this buy choosing File > Log In As Administrator. Tap in your password and you’re ready to go.
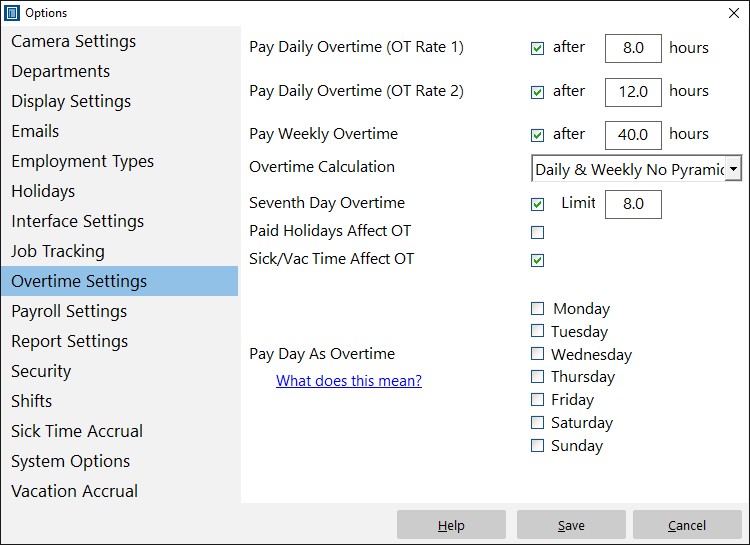
- Once you’re logged in, select Tools > Options. A new window will open and you’ll see a list on the left-hand side. Choose Overtime Settings from the list.
- Set the amount of hours the employees must work before receiving overtime pay. You can do this by checking the box next to “Pay Daily Overtime (OT Rate 1)” and then typing in the number of hours. For example, if you type “8” in the box, this means that the employee has to work eight hours before starting to receive overtime pay. Click the Save button to save the changes and close the Options window.
- The final thing to do is to actually set the hourly overtime rate. To do this, start by highlighting the employee on the “Employees” list. Select Employee Maintenance > Edit Selected Employee. A new window will open and you should see a list of four different categories on the left-hand side. From this list, choose “Payroll Information”. Look for “Hourly Payments” half way down the page on the right-hand side of the window.
Type the hourly overtime rate in the box labeled “OT 1 Rate / hr” and click “Save Employee”.


