by Mark Nemtsas | Nov 21, 2017 | Tips and Tricks
The Stand Alone Edition of Time Clock MTS can only be used on one computer. However, if you ever need to move it to a new computer (perhaps because the old one died) you’ll want to move your time clock software and data file to the new computer. When you run the Stand Alone Edition on the new computer for the first time you might be confronted by this screen:
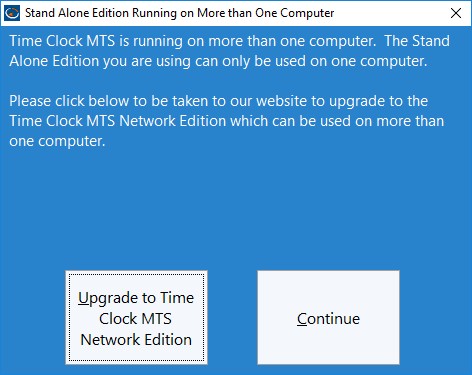
Warning : Time Clock MTS is running on more than one computer
This can happen because your old computer died while Time Clock MTS was running and some cleanup to your data file didn’t happen as it should. Rectifying the problem is simple. Just click the Continue button and then log in as the administrator and go to the Tools->Manage Connections screen.
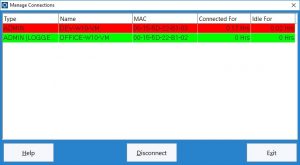
The Manage Connections Screen
On this screen you’ll see something like that above. The red line indicates the old computer’s connection to your time clock data file. All you need to do is click on that line and then click the Disconnect button. This will remove the entry and you should see something like this:
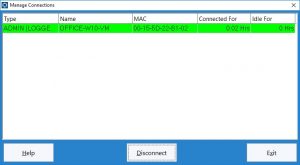
The old connection is now gone and you’re ready to use your new Stand-Alone installation without further interruption!
by Mark Nemtsas | Nov 20, 2017 | New Releases
Today saw version 6.1.4 of Time Clock MTS uploaded to our website. As usual upgrade installers can be downloaded from here or you can see some detailed instructions showing you how to upgrade your software here.
This release includes some serious improvements in report generation speed, reduction in access to the back-end database (Network Edition or Network PLUS Edition), and some minor bug fixes. Detailed release notes can be found below.
Improved Data Access Speed
Major reduction of number of queries made to the back-end data file, this was done by either caching certain data (such as employment types and holidays) or by preventing needless queries for employment types, bulletin assignments, bulletins, and holidays. In addition several cross table queries have been implemented to reduce the number of queries used. This includes getting job details and time notes when a time object is selected from the database rather than getting it later. Areas of particular improvement are the Edit Times screen, the Data Export process, and updating of employee details on the Employee List screen.
Report Time Punch Cache Implemented
To help speed up the time taken to create reports a new in-memory cache system has been created. This stores employee time punches in memory for later use during report generation instead of querying the database repeatedly for the same information. In some cases this has lead to a reduction in queries of up to 80% and report generation speeds appear to be anywhere from 2 to 5 times faster than previously. Currently this is implemented for the Payroll Summary Report, the Punchcard Report, the Working Hours Report, and the Data Export System. If no problems with the caching system are found it will be rolled out to all other reports in the next version.
Other Enhancements
Deactivated employees no longer appear on the Missing Days Report. The “Total” heading on the Daily Job Time Report has been changed to “Total Cost”. The file location of the connected data file is now displayed on the Help->About screen.
Fixes
Reports that allow filtering out of zero activity employees now have better filtering. For example, employees who are deactivated no longer display, and employees whose hire data is AFTER the report date are no longer displayed. A fix was made to available sick and vacation time when the accrual start date was overridden at the employee level. Windows version detection (used for debugging and error reporting) has been moved to a .NET component and now actually works.
by Mark Nemtsas | Nov 17, 2017 | Tips and Tricks
From time to time we get asked how to change the date format on the report configuration screen. In fact, you cannot change the format from within our software because the format used is retrieved from the Windows regional date format setting. However, you can certainly change the format, from say, MM/DD/YYYY to DD/MM/YYYY but you’d have to change the regional date format that Windows uses and then restart Time Clock MTS to pick up the new setting.
For example here’s the relevant part of the Report Configuration screen with the Windows 10 Region Format set to English (United States):
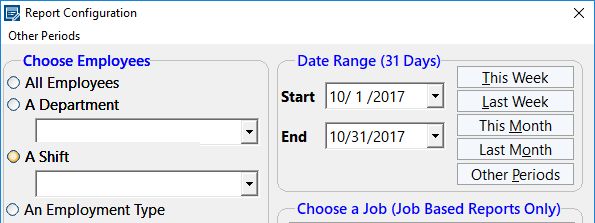
English (United States) MM/DD/YYYY Format
And here’s what it looks like with the Windows 10 Region Format set to English (Australia):
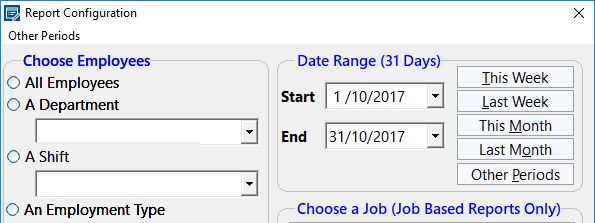
English (Australia) DD/MM/YYYY Format
Now, how you change your Windows regional date format is really beyond the scope of this article. But if you’re on Windows 10 type “region” into the taskbar search box and choose the Region & Language Settings option. Then choose the Additional date, time, & regional settings option which you’ll see part way down the screen. Finally on the Clock Language, and Region window choose the Change date, time, or number formats and choose your regional format from the window that then appears.
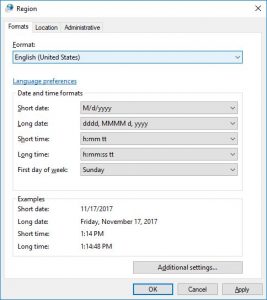
Choosing the Date Format Region (Windows 10)
by Mark Nemtsas | Nov 6, 2017 | How To, Tips and Tricks
Time Clock MTS records all time punches accurate to the second. It can display elapsed times between time punches in either hours and minutes (1:30) or decimal hours (1.50). Hours and minutes are typically used for timesheets in most businesses. Decimal hours are usually used when time needs to be tracked, costed, and even charged out. Obviously it’s a lot easier to cost out 10.85 hours at $50 / hr than it is to cost out 10 hours and 51 minutes at $50 per hour. Changing how times are displayed in Time Clock MTS is controlled from the Tools->Options->Report Settings Screen.
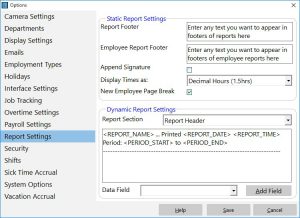
Change the Time Display Format on the Report Settings screen.
Choosing between the two time display formats is simply a matter of choosing an option from the Display Times as drop down.
A Comparison of the Two Time Display Formats
Below is a side-by-side comparison of the same time card displayed with hours and minutes (left) and decimal hours (right).
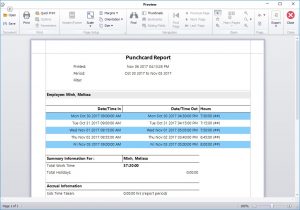
Hours and Minutes
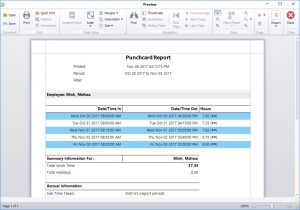
Decimal Hours
Some examples to note are the first time punch, recorded as 7 hours and 30 minutes on the left and as 7.50 hours on the right, and the second punch recorded as 7 hours and 15 minutes on the left and 7.25 hours on the right.
by Mark Nemtsas | Oct 30, 2017 | News
We’ve just posted a small update to our tool to export data to SQL Server or MySQL. The rather imaginatively named “Database Exporter” will now gracefully handle the case where NULL values have been inserted into numeric database columns. This can ONLY happen if you’ve added custom data columns to the Time Clock MTS database, as Time Clock MTS is well-mannered enough to make sure it actually inserts values into numeric columns rather than leaving them NULL or empty.
The latest version of our Database Exporter tool can be downloaded from here. Note that this tool CAN ONLY BE RUN FROM A COMPUTER WITH TIME CLOCK MTS INSTALLED ON IT as it is dependent on libraries that are installed with our time clock software. Note also that it must be installed in the same folder that Time Clock MTS is.


